Introduction
This book serves as documentation on how to run the different components of the ioCarb project.
Installing the Drivers
First, flash a fresh Raspberry Pi OS legacy version with 32 bits on to your micro-SD card. I used Raspberry Pi Imager, make sure to enable ssh in the profile before flashing.
On the RPi
Plug the micro-SD card in the RPi and note the IP address once it booted into the OS.
Then connect to it with ssh (I use Putty on my Windows machine) and and upgrade it.
sudo apt-get update && sudo apt-get -y upgrade
Enable SPI, I2C and interfaces and disable Seriel console, when asked say "No" and next "yes".
sudo raspi-config
Clone the pyCrypto repo
git clone https://github.com/Zokrates/pycrypto.git
Clone the GPS repo
git clone https://github.com/finamon-de/gps-4g-hat-library.git
cd gps-4g-hat-library/
Install the virtual environment and the following dependencies.
python3 -m venv .venv --system-site-packages
source .venv/bin/activate
python3 -m pip install pynmea2 python-dotenv pyserial gpiod smbus tensorboard_logger

pip uninstall -y gpiod numpy
pip install numpy paho-mqtt bitstring pynmea2 numpy==2.0
sudo apt install -y python3-libgpiod libopenblas-base
copy all the files to the gps-4g-hat-library folder.
The newer code of BG77X.py throws errors. Take the 2 year old one.
If you use a UMTS Stick (in my case Huawei E160)
sudo apt install -y wvdial
sudo nano /etc/wvdial.conf
wvdial.conf configuration for ISP (E-Plus)
[Dialer Defaults]
Init1 = ATZ
Init2 = ATQ0 V1 E1 S0=0 &C1 &D2 +FCLASS=0
Modem Type = USB Modem
Baud = 460800
New PPPD = yes
ISDN = 0

[Dialer umtseplus]
Modem = /dev/ttyUSB0
Dial Command = ATD
Carrier Check = no
Phone = *99#
Password = "eplus"
Username = "gprs"
Stupid Mode = 1
Init4 = AT+CGDCONT=1,"IP","internet.eplus.de"
Dial Attempts = 2
Connect to internet
wvdial -C /home/user/wvdial.conf umtseplus
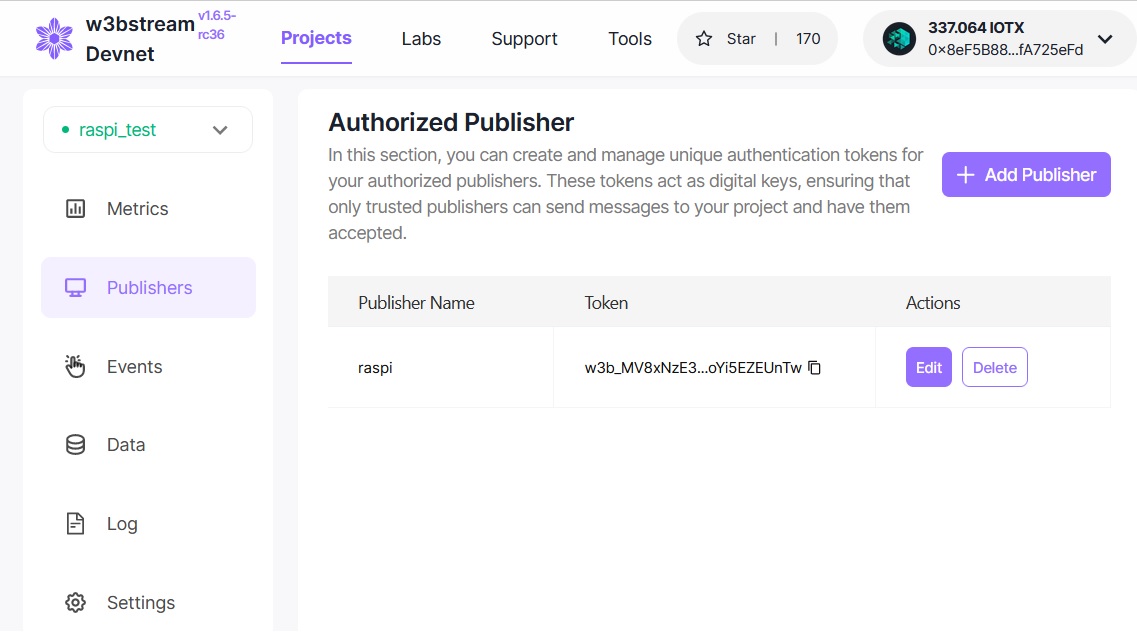
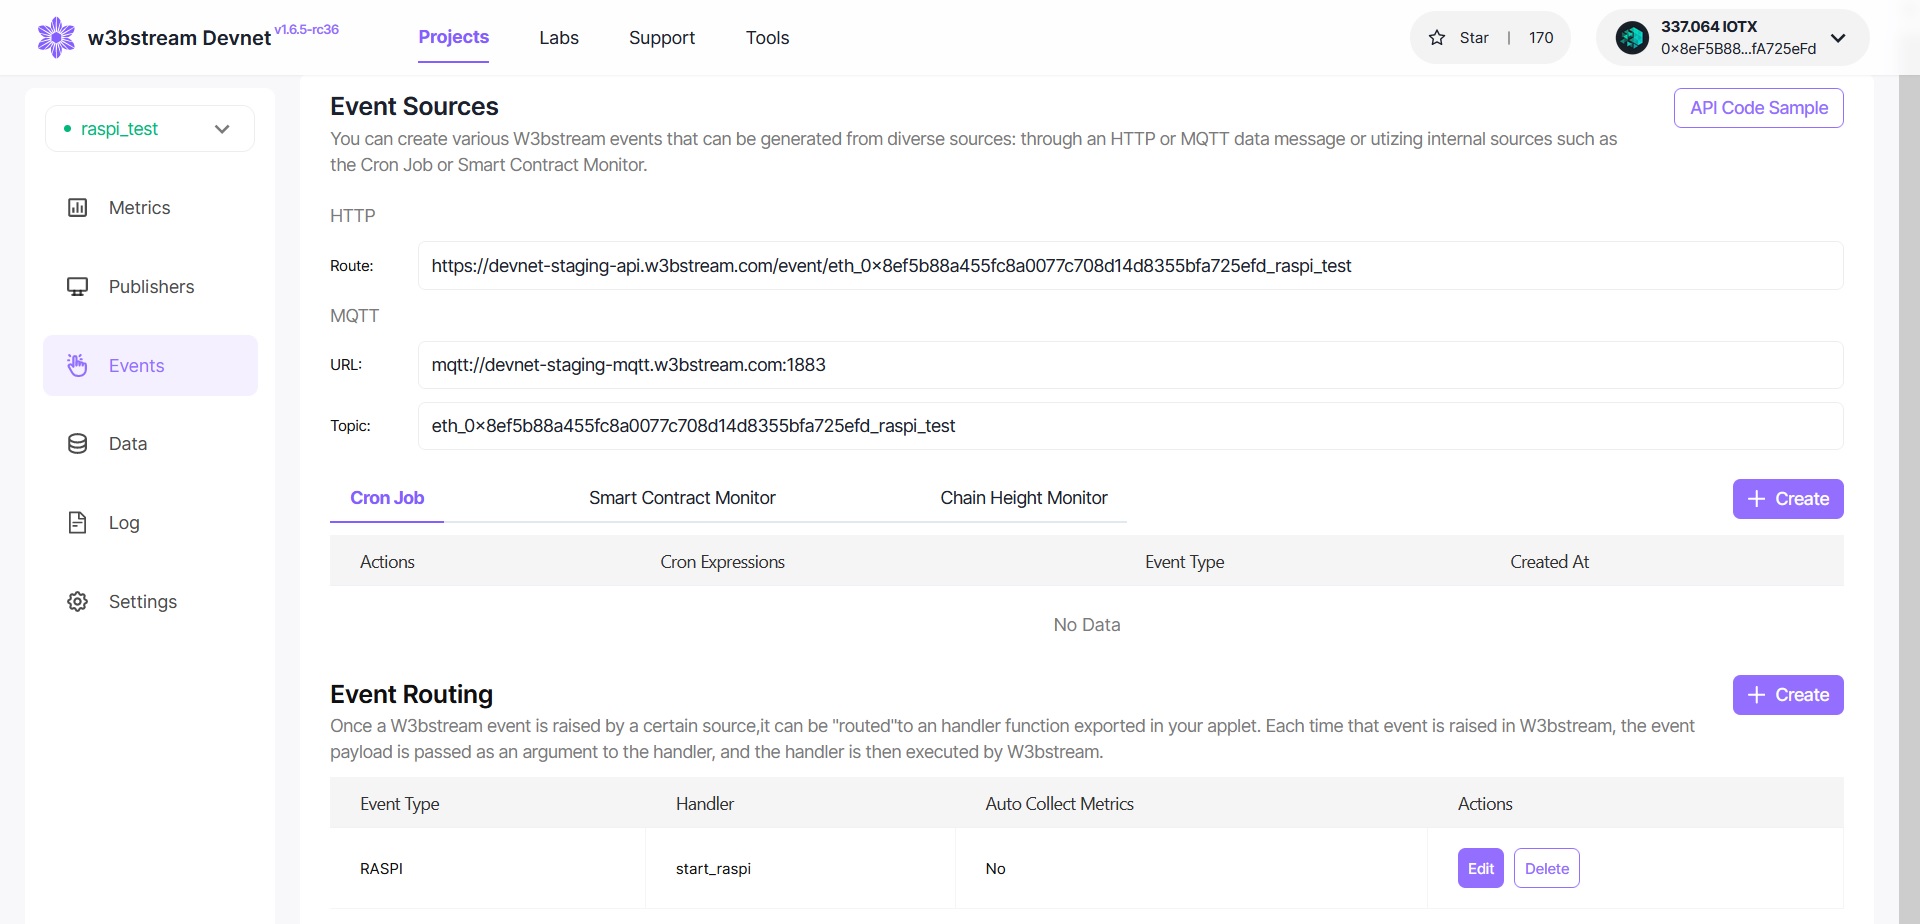
Get the MQTT Settings from W3bstream (for illustrative reasons)
Open https://devnet-staging.w3bstream.com/. Here you login with your IoTex wallet and create a new project and add our wasm and json file.
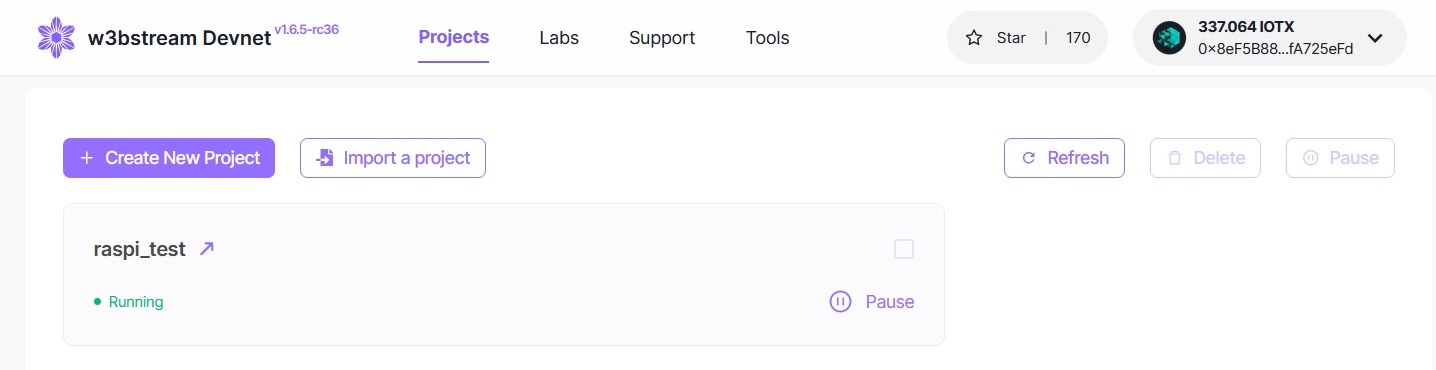
Add a new publisher and copy the Token.
Now check the events page and copy the Token and Topic.
On the RPi
Now return to the RPI and enter the copied values (Topic, Token and URL) to the apropriate place in the test code.
W3bstream overview
requirements
you need
- docker and docker-compose
- golang
obtaining w3btream
clone our w3bstream fork
git clone --depth 5 https://github.com/ioCarb/sprout
build ioctl
- clone our
iotex-corefork
git clone --depth 5 https://github.com/ioCarb/iotex-core-old.git
- to compile ioctl,
cdto the iotex-core folder and run:
make ioctl
- set the endpoint to be the local w3btream docker container
ioctl config set wsEndpoint 'localhost:9000'
- the binary will be
iotex-core/bin/ioctl, you can execute it from there or copy it to some location in your$PATH
NOTE: Please keep in mind, that these versions are not up to date with the iotex upstream. This is mostly due to undocumented, workflow breaking changes, for example when using the ioctl command line tool where the
-tflag in the upstream code expects a number representing a zkp mechanism but the official documentation a string.
compile circuit
download the zokrates-cli to compile your root.zok and perform the setup phase
compile
./zokrates compile --stdlib-path stdlib -i root.zok
perform zokrates setup
./zokrates setup
creating a config
Configs contain all information retaining to a project, like the blockchain endpoint, the compiled zk-circuit etc.
create a config file using ioctl:
The default values for -p and -k are the same as selected below so feel free to not set these options. The -e field is used for the proving scheme. Just use ioctl ws procject config --help for help
ioctl ws project config -t "zokrates" -i out -e "g16" -p proving.key -k verification.key
copy the output config (default: zokrates-config.json) to test/projects/20000 of your w3bstream folder
modifying the config
to make w3bstream send the proof to the previously defined smart contract change the output field in the newly generated config like:
"output": {
  "type": "ethereumContract",
  "ethereum": {
    "chainEndpoint": "https://babel-api.testnet.iotex.io",
    "contractAddress": "",
    "receiverContract": "",
    "contractMethod": "verifyTx",
    "contractAbiJSON": "[eth abi json]"
  }
}
the abi field doesn't matter for now as the zokrates-sprout service reads the abi from file system which, thus the abi needs to copied in your zokrates-sprout folder.
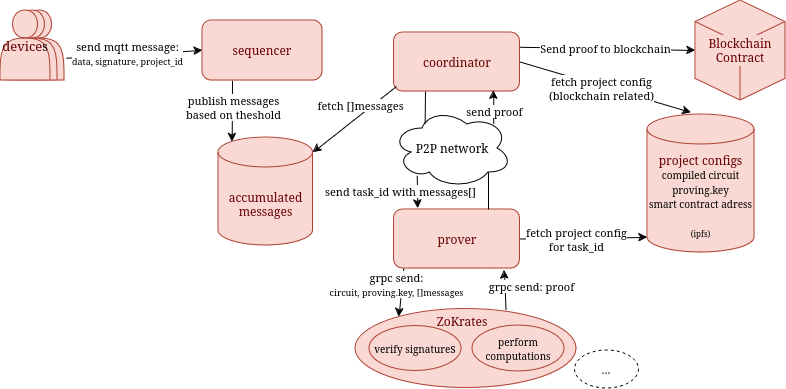
running w3bstream
"integrate" zokrates-sprout
zokrates-sprout is an additional zksnark mechanism for w3bstream using ZoKrates developed by us.
when you're in the the parent folder of w3bstream run:
git clone https://github.com/ioCarb/zokrates-sprout.git
set smart contract
set the verifier smart-contract address as the CONTRACT_WHITELIST env var in the docker-compose.yaml. W3bstream will send the proof there.
CONTRACT_WHITELIST=0xYOUR_ADDRESS
NOTE: the
CONTRACT_WHITELISTis originally meant for aroutercontract, however the iotex documentation neither says how to create one nor explains what it is. In our deployment scenarios, w3bstream nodes are only meant for single smart-contracts, thus having a static smart-contract address is not an issue.
start w3bstream
- if you have run w3bstream before, make sure the
postgresfolder is deleted (you need to be root for this). (otherwise the docker build stage might throw errors) - stop and delete all docker containers (not sure if this is needed on all systems 🤷) WARNING: this command will stop and remove all of your docker containers
[ -n "$(sudo docker ps -a -q)" ] && sudo docker stop $(sudo docker ps -a -q) || echo "No containers to stop" && [ -n "$(sudo docker ps -a -q)" ] && sudo docker rm $(sudo docker ps -a -q) || echo "No containers to remove"
- build, start and monitor w3bstream
docker-compose build && docker-compose -f docker-compose.yaml up -d && docker-compose logs -f coordinator sequencer prover zokrates
because of zokrates' compile times this step might take very long, but if you don't change the zokrates-sprout code, the built image/container will be cached
sending data to w3bstream
put the message you intend to send in a file. For this example add 337 113569 to the input.txt file
in a different window/tab then the w3bstream docker log, run:
./bin/ioctl ws message send --project-id 20000 --project-version "0.1" --data "$(cat input.txt)"
and look at the output of the docker log to see the generated proof be sent to the coordinator, which will then send the proof to the blockchain
if you dont want to save the input to an extra file just run:
./bin/ioctl ws message send --project-id 20000 --project-version "0.1" --data "337 113569"
NOTE: Sometimes the messages wont arrive because some error occured during starting the w3bstream services. In this case you might want to try running-w3bstream.md again.
Blockchain Project
This project is a blockchain application built using Hardhat.
Table of Contents
Prerequisites
Before you begin, ensure you have met the following requirements:
- You have installed Node.js and npm
Installation
To install this project, follow these steps:
- Navigate to the project directory:
cd blockchain - Install the dependencies:
npm install
Configuration
The project uses Hardhat as the development environment. You may want to adjust the hardhat.config.js and the .env file to suit your needs.
Otherwise, the example project can be used which has the VCM use case deployed.
Smart Contracts
The VCM project has following smart contracts deployed:
DeviceRegistry.sol: Registry of devices and vehiclesVerifier.sol: zk-Verifier generated by ZoKratesAllowanceContract.sol: On-chain business logic of carbon allowance use caseCarbToken.sol: ERC20 token CarbTokenCarbCertificate.sol: ERC721 token CarbCertificate
Deployment and Initial Setup (not needed if sample project wants to be executed)
To deploy the smart contracts (Initial Setup) on the testnet:
- Run the deployment script:
npx hardhat ignition deploy ./ignition/modules/FirstPart.js --network testnet - Add all available .env variables
- Run deployment script to deploy the Verifier (address of AllowanceContract is set during deployment):
npx hardhat ignition deploy ./ignition/modules/Verifier.js --network testnet - Add Verifier address in .env file
- Run the AccessManagement script:
npx hardhat run scripts/1_AccessManagement.js --network testnet - Run the OperationalSetups script:
npx hardhat run scripts/2_OperationalSetups.js --network testnet
(add or adjust company/device/vehicle data as needed, default is one company, one device, one vehicle as in .env template) 7. Initial setup is complete, Verifier ready to receive proofs
Scripts
There are multiple scripts to interact with the smart contracts:
scripts/1_AccessManagement.js: Set access roles and addresses within the contracts for initial setupscripts/2_OperationalSetups.js: Operational setups for initial setupscripts/3a_OperationalFunctions.js: Additional operational functions (ioCarb)scripts/3b_OperationalFunctions.js: Additional operational functions (company)scripts/4_TokenTrading.js: Send IOTX and CRBscripts/5_AdditionalGetterFunctions.js: Getter functions for different datascripts/utils/: Additional functions used during testing
To run a script:
npx hardhat run scripts/[script-name].js --network testnet
Sample blockchain walkthrough
To simulate and test the behavior of a proof being received, the util scripts/utils/EmissionReportVerifier.js script can be executed. This will load the corresponding scripts/utils/proof.json and send it as a transaction to the IoTex testnet.
The calculated CO2 emission from the sample proof is 28,390. As the allowance is set to 30,000 and only one vehicle is registerred under the company, the AllowanceContract (Business Logic) will trigger the minting process of 1,610 tokens.
To see the current portfolio and the latest NFT of the reviewed company, the util scripts/3b_OperationalFunctions.js script can be executed.
Step-by-step walkthrough
- Check if the compancy is reset or refer to step 4:
npx hardhat run scripts/5_AdditionalGetterFunctions.js --network testnet
Expected output:
Company 0xa2490c896ac250bf5604aff008a9cebca705de20 stats: 30000,0,1,0
Allowance: 30000 Reported Emissions: 0 Registerred Vehicles: 1 Number of reports received: 0
- Execute the transaction to send the proof to the blockchain:
npx hardhat run scripts/utils/EmissionReportVerifier.js --network testnet
- Check if the report has been successfull:
npx hardhat run scripts/5_AdditionalGetterFunctions.js --network testnet
Expected output:
Company 0xa2490c896ac250bf5604aff008a9cebca705de20 stats: 30000,28390,1,1
Allowance: 30000 Reported Emissions: 28390 Registerred Vehicles: 1 Number of reports received: 1 3. Check your available CRB tokens, NFTs, and display the latest certificate:
npx hardhat run scripts/3b_OperationalFunctions.js --network testnet
Expected output (amount of CRB, available NFTs (tokenIDs), and latest NFT data will be different):
Balance of 0x0a0c2A51609531D488CCE7e0496e6DC7517FaF75: 3220
Available NFT tokens: 0,1
NFT 1 data: 1724665710,0xA30c7fEBFf75b2941277357f51191482190bF7d0,Congratulations, 0xa2490c896ac250bf5604aff008a9cebca705de20 met the allowance for week 34 in 2024
- Reset the company account to start a new week:
npx hardhat run scripts/3a_OperationalFunctions.js --network testnet